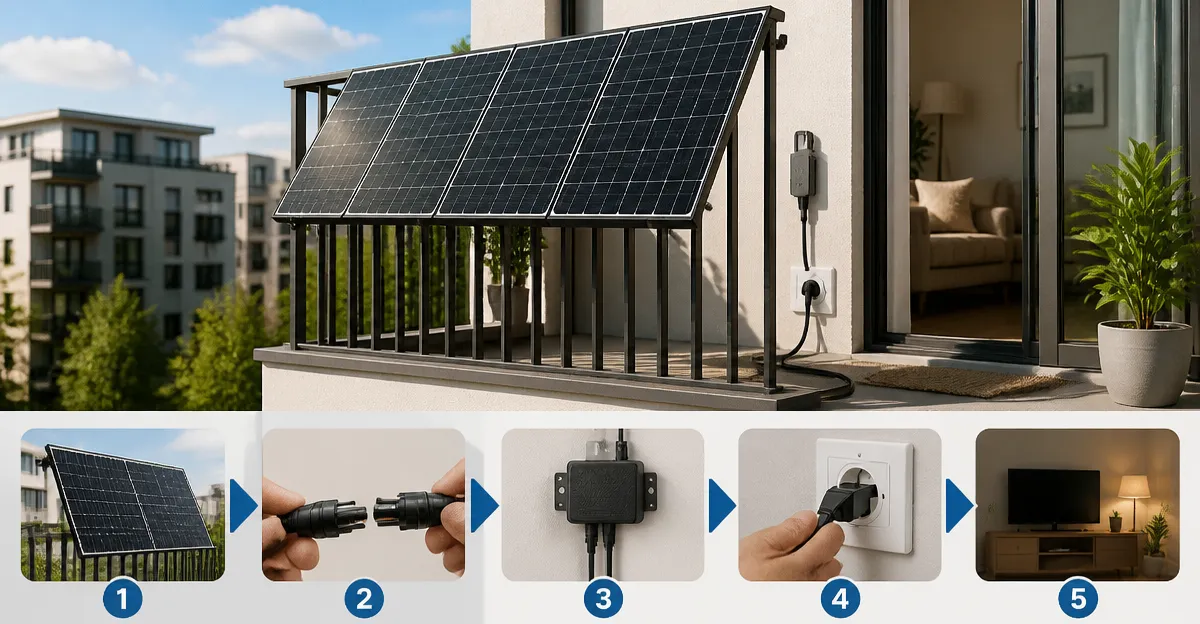
How to Connect Plug-and-Play Solar Panels to an Apartment Grid: Step-by-Step Safety & Legal Guide
Introduction
Urban dwellers increasingly seek renewable energy solutions that do not require structural modifications. This guide explains how to integrate plug-and-play solar panels into an apartment building while complying with safety codes and lease agreements. Readers will learn the essential components, the legal considerations, and the practical steps to achieve a reliable off‑grid supplement. By following the instructions, one can reduce electricity bills, increase resilience, and contribute to a greener community.
What You'll Need
- Portable solar panel kit (e.g., SOLPERK 20W Solar Battery Charger Kit)
- Higher‑capacity bifacial panels for rooftop mounting (e.g., Callsun 400W Bifacial Solar Panel 2‑Pack)
- Foldable panel for emergency backup (e.g., FlexSolar 100W Foldable Solar Panel)
- Inverter or power station compatible with 12‑V/24‑V systems
- Mounting hardware, weather‑proof connectors, and a dedicated circuit breaker
- Multimeter, wire strippers, and basic hand tools
Step 1: Verify Lease and Local Regulations
The first step is to confirm that your lease permits the installation of external energy devices. Review the building's rules regarding roof access, balcony load limits, and aesthetic restrictions. Contact the property manager and request written permission to place solar panels on a balcony rail or a communal roof area. Obtaining approval protects you from potential lease violations and ensures compliance with municipal building codes.
Step 2: Conduct a Site Assessment
Identify a location that receives at least six hours of direct sunlight per day. Use a digital sunlight calculator app to map the sun path over the course of the year. Measure the available surface area and verify that the weight capacity of the balcony or roof structure exceeds the panel's load (most panels are under 30 lb). For apartments with limited roof access, a portable kit such as the SOLPERK 20W Solar Battery Charger Kit provides a lightweight, 20‑W solution that can be mounted on a rail or balcony railing.
Step 3: Choose the Appropriate Solar Kit
If the goal is modest battery maintenance, the SOLPERK kit is ideal because it includes a high‑efficiency monocrystalline panel, an 8 A MPPT charge controller, and an adjustable mounting bracket. Its 21‑30% cell efficiency and waterproof construction (rated for 2400 Pa wind and 5400 Pa snow) guarantee durability in an urban environment. For higher power demand—such as running a power station for a home office—a bifacial system like the Callsun 400W Bifacial Solar Panel 2‑Pack delivers up to 30% extra energy by capturing reflected light from the balcony floor. The Callsun panels feature N‑type 16BB cells, a low temperature coefficient of –0.3%/K, and a 10‑year support guarantee, making them a robust choice for rooftop installations.
For emergency or portable use, the FlexSolar 100W Foldable Solar Panel offers ultra‑lightweight portability (4.1 lb) and multiple output ports (PD 3.0 USB‑C, QC 3.0 USB‑A, and 100 W DC). Its IP67 rating ensures operation during rain or dust storms, and the included 4‑in‑1 charging cable simplifies connections to power stations or battery banks.
Step 4: Install the Mounting System
Secure the mounting bracket supplied with the SOLPERK kit or the pre‑drilled holes on the Callsun panels using stainless‑steel bolts. Ensure the bracket can rotate 360° to achieve optimal tilt—typically 30° for a latitude of 35° to maximize solar incidence. Verify that the mounting hardware does not protrude beyond the balcony railing, as this could violate fire‑code clearance requirements. Tighten all connections with a torque wrench to prevent loosening due to wind loads.
Step 5: Wire the Panels to a Charge Controller
Connect the solar panel positive and negative leads to the inputs of the MPPT charge controller included in the SOLPERK kit. The controller’s intelligent three‑stage charging algorithm prevents over‑charging, over‑voltage, and short‑circuit conditions, which is essential for safety in a shared electrical environment. For the Callsun bifacial panels, use the supplied MC4 connectors and route the cables through a weather‑proof conduit to a dedicated 12 V/24 V charge controller that matches the panel voltage (typically 8 A or higher). Verify polarity with a multimeter before tightening the connections.
Step 6: Integrate with an Inverter or Power Station
After the battery bank is charged, connect the battery terminals to a pure‑sine‑wave inverter that supplies AC power to your apartment appliances. Select an inverter rated for the total wattage of your loads; a 500 W portable inverter is sufficient for a laptop, LED lighting, and a small fridge. The FlexSolar panel’s 100 W DC output can directly charge a compatible power station (e.g., a 500 Wh LiFePO₄ unit) via the PD 3.0 USB‑C port for fast charging of laptops and phones.
Step 7: Implement Safety Devices
Install a dedicated circuit breaker in the apartment’s sub‑panel to isolate the solar system from the building’s main supply. Use a DC‑rated fuse (5 A for the SOLPERK kit, 15 A for the Callsun panels) on the positive lead to protect against short circuits. Ground the metal frame of each panel to the building’s grounding system using a grounding rod or the existing ground bus, as required by NEC Article 690.
Step 8: Test and Commission the System
With the sun at its peak, measure the open‑circuit voltage (Voc) and short‑circuit current (Isc) of each panel using a multimeter. Compare the readings to the specifications listed on the product pages (SOLPERK 20 W panel: ~18 V Voc, 1.2 A Isc; Callsun 200 W panel: ~36 V Voc, 5.5 A Isc). Verify that the charge controller displays the correct battery voltage and that the inverter outputs clean 120 V AC. Record the initial performance data for future reference.
Tips & Pro Tips
- Orient panels toward true south (or north in the Southern Hemisphere) for maximum daily exposure.
- Use anti‑reflective coating on the panel surface to reduce losses caused by glare from nearby windows.
- Schedule regular visual inspections to clear debris, especially after heavy rain or wind events.
- Consider adding a small battery buffer (e.g., a 12 V 100 Ah lead‑acid battery) to smooth out fluctuations during cloud cover.
- When using bifacial panels, place a light‑colored reflective surface (white gravel or a reflective mat) beneath the rear side to boost rear‑side irradiance.
Troubleshooting
Problem: Low output despite bright sunlight.
Solution: Check for shading on any part of the panel, verify that the MPPT controller is in "Maximum Power Point" mode, and confirm that cable connections are tight and free of corrosion.
Problem: Battery does not charge.
Solution: Ensure the battery voltage matches the controller’s setting (12 V vs 24 V), replace a blown fuse, and verify that the controller’s indicator LEDs show normal operation.
Problem: Inverter trips frequently.
Solution: Reduce the instantaneous load, check for shorted wires, and confirm that the inverter’s input voltage is within the battery’s state‑of‑charge range.
Conclusion
Connecting plug‑and‑play solar panels to an apartment grid is achievable with careful planning, proper permissions, and the right hardware. By following the eight steps outlined above, residents can safely harvest solar energy, reduce utility costs, and enhance energy independence. Remember to maintain compliance with lease terms and local codes, and to perform routine inspections to sustain performance. Embrace renewable energy in the urban landscape and inspire neighbors to adopt similar solutions.
Products Mentioned in This Guide
Frequently Asked Questions
Can I legally install plug‑and‑play solar panels in a rented apartment?
Yes, if your lease permits modifications and you obtain any required building or electrical permits, but always get written landlord approval first.
Do plug‑and‑play panels need professional wiring?
Most kits are pre‑wired and safe for DIY installation, though you must follow local electrical codes and may need a certified electrician to inspect the connection.
How do I connect the panels to the apartment’s existing grid without rewiring the building?
Use a portable inverter and a dedicated circuit breaker or a battery storage unit that feeds only your unit’s outlets, keeping the main building wiring untouched.
What safety features should I look for in a plug‑and‑play solar kit?
Choose kits with built‑in MPPT controllers, over‑charge protection, short‑circuit protection, and UL‑listed components.
Will plug‑and‑play panels noticeably lower my electricity bill?
They can offset a portion of your usage—typically 10‑30% for small kits—depending on panel size, sunlight exposure, and your consumption patterns.