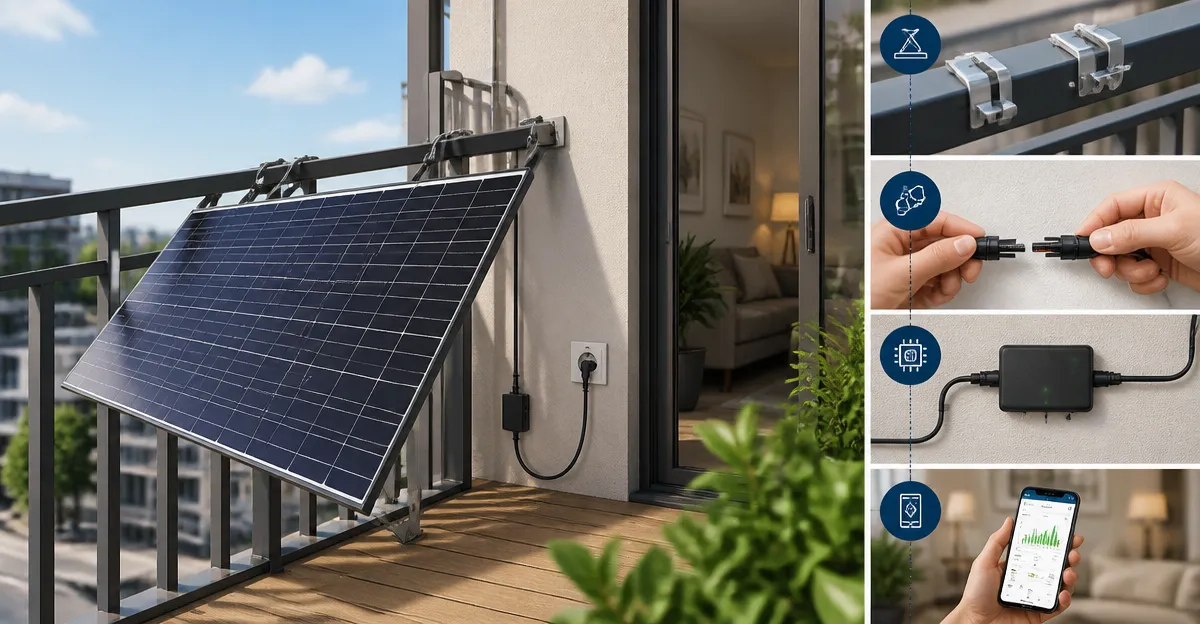
How to Install Plug‑In Solar Panels in an Apartment: Step‑by‑Step Guide for Renters
Introduction
Renters often assume that solar power is unavailable to them because of lease restrictions or lack of permanent roof access. This guide demonstrates how to overcome those obstacles by using plug‑in solar kits that require no structural modifications. Readers will learn how to evaluate sunlight exposure, select the appropriate kit, install the system safely, and monitor performance without violating rental agreements. By the end of the article, one will be able to reduce daytime electricity costs and lower a household carbon footprint while preserving the integrity of the rental property.
What You’ll Need
- Plug‑in solar kit (e.g., PluggedSolar 800W Solar Panel Kit)
- Portable mounting solution such as a lightweight ballast frame or a fold‑out balcony stand
- Extension cord rated for outdoor use (if outlet distance exceeds 5 feet)
- Basic hand tools (screwdriver, level, measuring tape)
- Smartphone with Wi‑Fi for inverter monitoring
Step 1: Assess Your Apartment’s Solar Potential
The first task is to determine whether the balcony, roof terrace, or large window receives sufficient sunlight. Use a smartphone app such as Sun Surveyor or simply observe the space for at least three consecutive days between 10 a.m. and 2 p.m. Record the number of peak‑sun hours, which is the period when direct sunlight is unshaded. Most plug‑in systems require a minimum of four to five peak‑sun hours to generate meaningful electricity.
If the space receives fewer than three peak‑sun hours, consider supplemental portable panels (e.g., ZOUPW 100W Portable Solar Panel) that can be repositioned throughout the day. However, for the purpose of this guide we assume adequate sunlight for an 800 W system.
Step 2: Choose a Plug‑In Solar Kit
Among the options listed, the PluggedSolar 800W Solar Panel Kit offers a balanced combination of power output, ease of installation, and cost. It includes four 200 W panels, a micro‑grid‑tie inverter with built‑in Wi‑Fi monitoring, and a 50‑foot pre‑wired cord that plugs directly into a standard 110/120 V wall outlet. The kit is priced at $1,395.00 and carries a rating of 3.6 / 5.0 from 24 reviews, indicating reliable performance for most renters.
The alternative, PluggedSolar 1.8KW Grid Tie Kit, provides higher output but requires more panels, additional mounting hardware, and a larger footprint, which may be impractical for typical apartment balconies. For most renters, the 800 W kit delivers an estimated 1,500 kWh per year, translating into a 20‑40 % reduction in daytime electricity bills.
Step 3: Prepare a Safe Mounting Location
Because the lease may prohibit permanent roof penetrations, use a non‑invasive mounting method. A portable ballast frame constructed from wooden pallets, concrete blocks, or a purpose‑built balcony stand can hold the panels securely without drilling. Position the frame so that the panels face true south (or north in the Southern Hemisphere) and tilt them at an angle equal to the latitude of the residence for optimal energy capture.
The 800 W kit’s panels measure 4.5 ft × 2.2 ft each, making them manageable for a balcony rail or a small roof deck. Ensure the frame is level, stable in wind, and does not obstruct neighboring units. The kit’s panels are lightweight enough to be lifted by one person, but it is advisable to have a second set of hands for safety.
Step 4: Connect the Panels to the Micro‑Inverter
Open the kit and lay out the four panels on the prepared frame. The kit’s instructions specify a two‑step wiring process. First, connect the positive (red) cable of the first panel to the negative (black) cable of the second panel. Repeat this pattern until all four panels are linked in series, forming a single high‑voltage DC string.
Next, attach the combined DC cable to the micro‑grid‑tie inverter, which is included in the kit. The inverter complies with UL 1741 for anti‑islanding protection, ensuring safe interaction with the utility grid. The inverter also incorporates a Wi‑Fi power monitor, allowing real‑time performance tracking via a smartphone app.
When the connections are secure, double‑check polarity with a multimeter. Incorrect polarity can damage the inverter and void the warranty. The kit’s built‑in safety features will shut down the system if a fault is detected, providing an additional layer of protection.
Step 5: Plug the Inverter into a Wall Outlet
Run the 50‑foot pre‑wired cord from the inverter to a standard 110/120 V outlet inside the apartment. The cord includes a grounded plug and is rated for outdoor use, allowing it to pass through a balcony door without creating a fire hazard. If the outlet is farther than the supplied length, use an outdoor‑rated extension cord with the same gauge to avoid voltage drop.
Insert the plug, then power on the inverter using the built‑in switch. Within six minutes, the inverter will synchronize with the utility grid and begin exporting excess power. The Wi‑Fi monitor will display instantaneous generation, consumption offset, and cumulative savings.
Because the system draws only a small amount of standby power when the sun is not shining, the overall impact on the apartment’s electrical load is negligible. The inverter’s built‑in auto‑stop function prevents back‑feeding during a grid outage, complying with most local interconnection rules.
Step 6: Set Up Monitoring and Optimize Placement
Download the inverter’s companion app (available for iOS and Android) and create an account. The app provides daily, weekly, and monthly reports on kilowatt‑hour generation, allowing renters to quantify cost savings and environmental impact. Use the data to fine‑tune panel orientation; a slight adjustment of 5‑10 degrees can increase output by up to 8 % during winter months.
If additional power is required for portable devices, consider integrating a small portable panel such as the ZOUPW 100W Portable Solar Panel. This panel features a 5‑in‑1 connector cable that can charge power stations, smartphones, or laptops directly, providing flexibility when the main balcony setup is shaded.
For renters who own a 12 V battery system in an RV or boat, the Voltset 20W Solar Battery Charger can be added to the same balcony outlet. Its MPPT controller delivers faster charging and protects against over‑charge, making it an ideal companion for off‑grid backup.
Tips & Pro Tips
- Check local lease clauses for any restrictions on external equipment; most landlords allow non‑permanent, removable installations.
- Secure the panels with non‑slip rubber pads or straps to prevent movement during strong winds.
- Use a surge protector on the inverter’s plug to safeguard against lightning‑induced spikes.
- Schedule a brief weekly inspection to clean dust or debris from the panel surface, as even a thin layer can reduce efficiency by up to 7 %.
- If the apartment experiences frequent power outages, consider a battery backup such as a portable power station; the inverter’s output can charge it directly when sunlight is available.
Troubleshooting
Problem: Inverter does not start after plugging in.
Solution: Verify that all panel connections follow the correct polarity sequence. Check that the wall outlet is functioning by testing another device. Ensure the inverter’s safety lock switch is in the “on” position.
Problem: Wi‑Fi monitor shows zero generation despite sunlight.
Solution: Confirm that the inverter is within Wi‑Fi range; relocate the router or use a Wi‑Fi extender. Restart the inverter and the app, then re‑pair the device.
Problem: Reduced output on cloudy days.
Solution: This is normal; cloud cover reduces irradiance. Consider adding a portable ZOUPW 100W Portable Solar Panel to capture diffuse light from multiple angles.
Conclusion
Installing plug‑in solar panels in an apartment is both feasible and financially rewarding when approached methodically. By assessing sunlight, selecting a suitable kit, employing a non‑invasive mounting solution, and following the wiring and plugging steps, renters can generate clean electricity without violating lease terms. Continuous monitoring and periodic adjustments ensure the system operates at peak efficiency, delivering measurable savings and contributing to a greener lifestyle.
Products Mentioned in This Guide
Frequently Asked Questions
Can I legally install plug‑in solar panels in a rental apartment?
Yes, because plug‑in kits are portable and require no permanent modifications, most leases allow them as long as you restore the space when you move out.
What type of mounting solution works best for balconies?
A lightweight ballast frame or fold‑out balcony stand provides stable support without drilling or damaging railings.
How do I choose the right solar kit size for my apartment?
Calculate your average daytime electricity use and match it to a kit’s wattage, typically 400‑800 W for most one‑room apartments.
Do I need special wiring or outlets to connect the panel?
Use an outdoor‑rated extension cord if the nearest outlet is more than 5 feet away and ensure the cord’s amperage rating exceeds the inverter’s output.
How can I monitor the performance of my plug‑in solar system?
Most kits include a Wi‑Fi‑enabled inverter that streams real‑time data to a smartphone app, showing generated kWh and savings.