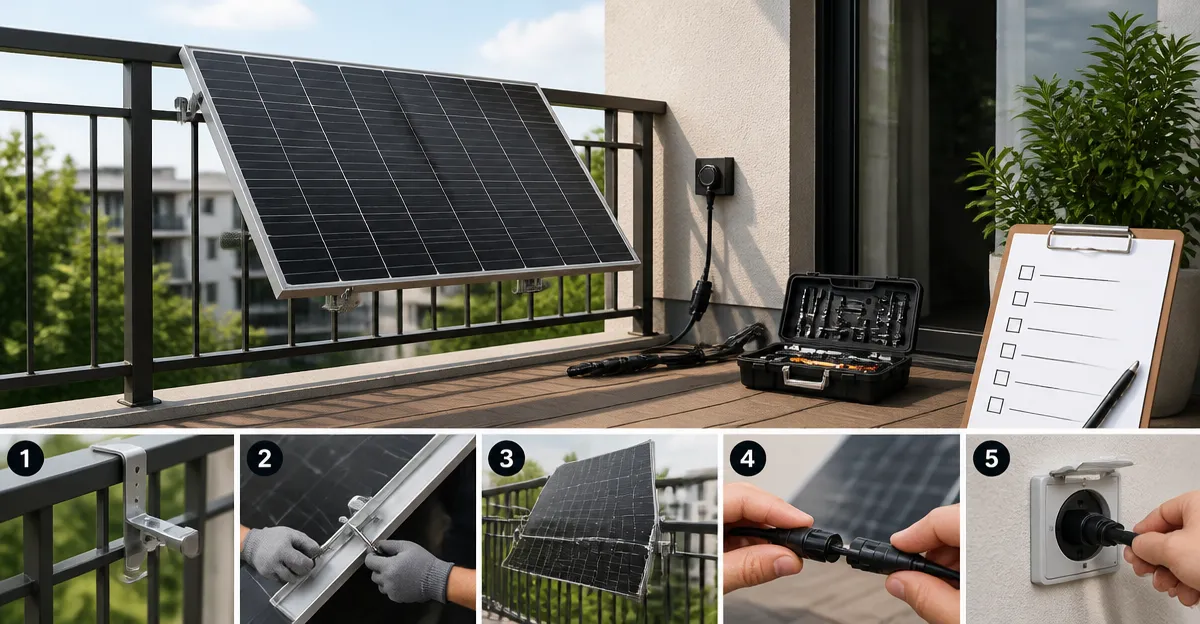
How to Install Plug-and-Play Balcony Solar: The Ultimate Step-by-Step Installation Checklist for Apartment Solar Panels
Introduction
Urban dwellers increasingly seek renewable energy solutions that fit within limited living spaces. This guide explains how to install a plug‑and‑play solar system on a balcony, turning an ordinary railing into a reliable power source. Readers will learn how to assess structural suitability, select appropriate panels, and connect the system safely. By following the checklist, one can generate clean electricity without compromising building regulations.
What You’ll Need
Before beginning, gather the following items. A portable solar panel that matches the balcony’s load‑bearing capacity, mounting brackets or suction‑cup clamps, appropriate cables (MC4 or USB‑C), a small power station or battery, a multimeter for verification, and basic hand tools such as a screwdriver and wrench. Optional accessories include a weather‑proof junction box and a protective cover for rainy climates. All recommended products are listed later in the guide.
Step 1 – Evaluate Balcony Structure and Sun Exposure
Inspect the balcony railing, floor, and any adjacent walls to confirm they can support the weight of a solar panel. Measure the available surface area and note the direction the balcony faces; a south‑or‑west orientation receives the most daily sunlight. Verify that local building codes permit the installation of external equipment on balconies. Document any obstacles such as awnings or railings that could cast shadows during peak sun hours.
Step 2 – Choose the Right Plug‑and‑Play Panel
Selecting a panel that balances power output with portability is essential for apartment settings. For balconies with ample space (minimum 2 ft × 4 ft), the Renogy 200W Portable Solar Panel provides industry‑leading 25% efficiency, lightweight construction, and magnetic handles for easy setup. At $174.94 and a 4.4‑star rating, it delivers fast charging for power stations and devices via USB‑C, USB‑A, and MC4 outputs. For smaller balconies or rooftop rails, the FlexSolar 100W Foldable Solar Panel offers a compact 4.1 lb design, 23% efficiency, and a rugged IP67 rating, making it ideal for limited footprints. It costs $80.99 and holds a 4.4‑star rating, delivering three‑in‑one outputs (USB‑C, USB‑A, DC). If the balcony rail is curved, the Renogy 200W Flexible Solar Panel can conform to irregular surfaces, weighing half as much as a rigid panel and featuring half‑cut PERC cells for higher conversion. Priced at $200.49 with a 4.5‑star rating, it includes pre‑drilled mounting holes for quick attachment.
Step 3 – Prepare Mounting Hardware
Secure the panel using brackets that do not damage the balcony’s finish. Adjustable suction‑cup mounts work well on glass or smooth metal railings, while clamp‑style brackets grip wooden or metal railings without drilling. Ensure the brackets can tilt the panel to an optimal angle of 40°–60° for maximum solar capture. Tighten all fasteners evenly to avoid stress points that could lead to panel movement in windy conditions.
Step 4 – Install the Solar Panel
Place the panel on the prepared brackets and verify that the magnetic handle (for the Renogy 200W Portable) or the built‑in kickstands (for the FlexSolar panel) are engaged securely. Adjust the tilt angle using the built‑in 3‑position mechanism to face the sun directly at solar noon. Double‑check that the panel’s surface is clean; dust or debris can reduce output by up to 20 %. Finally, lock the mounting hardware and route the cables away from foot traffic to prevent accidental tripping.
Step 5 – Connect to a Power Station or Battery
Most balcony installations feed power into a small portable power station, which stores energy for later use. Use the MC4 cable supplied with the Renogy or FlexSolar panels to connect directly to the power station’s solar input. If the power station only accepts USB‑C, attach the panel’s USB‑C port (45 W max on the Renogy 200W Portable). For flexible panels that lack built‑in charge controllers, the DOKIO 150W Portable Solar Panel Kit includes a PWM controller that protects the battery from over‑charging and reverse polarity. Priced at $87.77 with a 4.1‑star rating, the kit also provides a 9.8 ft cable, allowing the panel to sit in full sun while the controller remains shaded.
Step 6 – Verify System Performance
Power on the portable station and observe the input voltage and current on its display. A fully illuminated panel under direct sunlight should show at least 18 V and a current consistent with its rated wattage (e.g., 200 W ÷ 18 V ≈ 11 A). Use a multimeter to confirm that the voltage remains within the safe range specified by the power station’s manual. Record the readings for several hours to ensure stable performance throughout the day.
Tips & Pro Tips
- Orient the panel toward true south (or north in the southern hemisphere) to maximize daily energy harvest.
- Apply a non‑slip rubber pad beneath suction‑cup mounts to improve grip during windy evenings.
- Schedule regular cleaning using a soft cloth and mild soap; avoid abrasive materials that could scratch the panel’s surface.
- If the balcony receives partial shade, consider adding a small reflective surface (e.g., white poster board) to redirect light onto the panel.
- When using the Renogy flexible panel, attach it with flexible adhesive tape rather than permanent screws to preserve the balcony’s aesthetics.
Troubleshooting
Problem: Power station shows no input despite bright sunlight.
Solution: Verify that the MC4 connectors are fully seated and that the polarity matches the station’s input. Use the multimeter to test continuity of the cable.
Problem: Output drops sharply when a cloud passes.
Solution: Panels with higher efficiency (Renogy 200W Portable or FlexSolar 100W) maintain better performance in low‑light conditions due to superior cell technology. Consider adding a second panel in parallel to smooth fluctuations.
Problem: Mounting brackets feel loose after a strong wind gust.
Solution: Tighten all bolts and add a secondary safety strap. For suction‑cup mounts, re‑apply a small amount of silicone adhesive to improve adhesion.
Conclusion
By following this checklist, one can transform a modest balcony into a functional solar generator without violating lease agreements or building codes. The guide covered structural assessment, product selection, mounting, wiring, and performance verification. With the right tools, even apartment residents can enjoy the financial and environmental benefits of renewable energy. Begin the installation today and experience clean power generated right at home.
Products Mentioned in This Guide
Frequently Asked Questions
Can I install a plug‑and‑play solar panel on any balcony?
Only if the balcony can support the panel’s weight and receives sufficient unobstructed sunlight for the required hours.
What tools are essential for a balcony solar installation?
You’ll need a screwdriver, wrench, multimeter, and the mounting hardware that comes with the panel.
Do I need a separate battery or power station?
Yes, a small battery or power station stores the generated electricity and provides a stable output for devices.
How do I verify the system is safely connected?
Use a multimeter to check voltage and polarity at the panel and battery connections before plugging in any load.
Are there building‑code considerations for balcony solar?
Check local regulations and your lease or condo rules to ensure mounting methods and electrical connections are permitted.