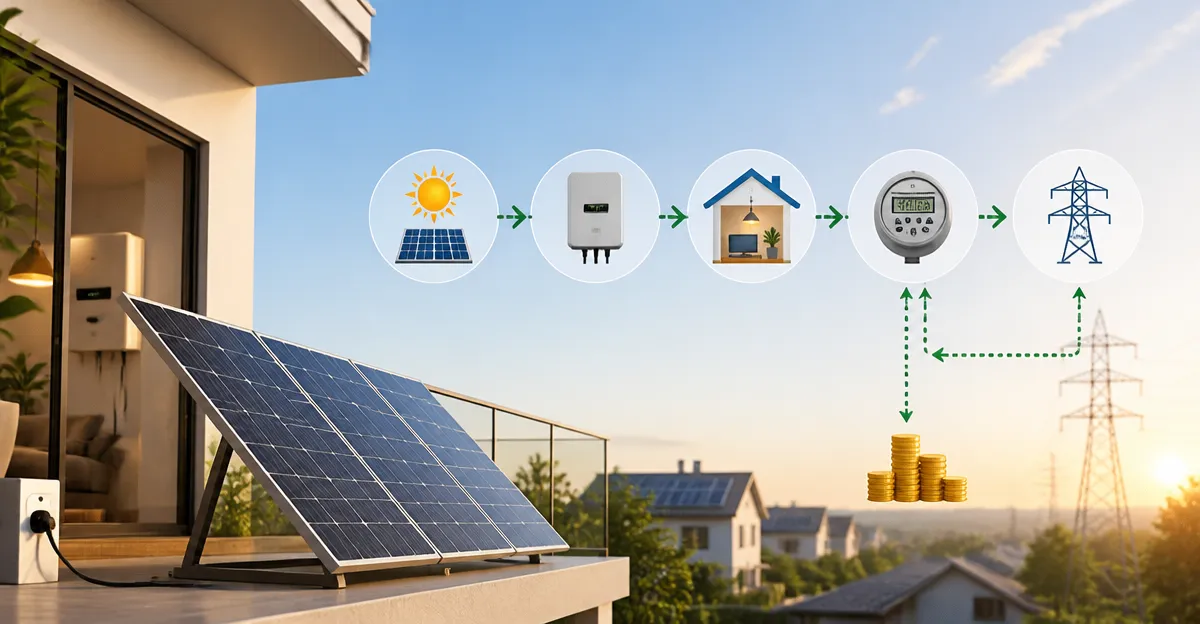
How to Sell Excess Power from Plug‑In Solar Panels: Step‑by‑Step Guide to Net Metering, Feed‑in Tariffs & Earning Money
Introduction
Homeowners with rooftop solar installations often wonder how to turn unused electricity into revenue. This guide explains the regulatory pathways, technical requirements, and practical actions required to sell surplus power back to the grid. By following the steps, one can comply with local utility policies, maximize financial returns, and contribute to a cleaner energy system. The information is valuable for anyone who has invested in plug‑in solar panels and seeks to monetize excess generation.
The article covers the concepts of net metering and feed‑in tariffs, outlines the equipment needed, and provides actionable instructions for each phase of the process. Readers will also receive expert tips, common‑issue troubleshooting, and a curated list of recommended products that simplify installation and monitoring. Although the guide references specific tools, the core principles remain applicable even without additional purchases.
What You Will Need
- Grid‑connected inverter with export‑limit monitoring capability.
- Smart energy meter or utility‑approved bidirectional meter.
- Appropriate mounting hardware for the chosen solar panels.
- Battery storage (optional, for load shifting).
- Safety gear, including insulated gloves and voltage tester.
- Documentation required by the local utility (application forms, site plan, and proof of equipment certification).
Below are several solar panel products that can serve as the primary generation source for the steps described. Each product includes a brief overview, price, and rating to aid decision‑making.
Step 1: Verify Eligibility and Understand Local Policies
The first action is to confirm that the residence is eligible for net metering or a feed‑in tariff program. Many utilities publish eligibility criteria on their websites, including system size limits, interconnection standards, and required certifications such as UL 61730. One should also review the compensation rate, which may be a one‑to‑one kilowatt‑hour credit (net metering) or a fixed payment per kilowatt‑hour (feed‑in tariff). Understanding these details prevents costly re‑engineering later in the project.
If the existing system does not meet the utility’s interconnection standards, it may be necessary to upgrade the inverter or add a dedicated export‑limit controller. For small‑scale installations, the Renogy 200W Portable Solar Panel provides a lightweight, high‑efficiency source that can be paired with a compatible grid‑tie inverter. Its 25% cell efficiency, magnetic handle design, and UL 61730 certification make it a reliable choice for meeting utility requirements while keeping the system portable.
Key product details: price $174.94, rating 4.4/5 from 742 reviews, and a weight of only 13.89 lb, which simplifies handling during installation. The panel’s multiple output options (USB‑C, USB‑A, and MC4) allow flexible connection to a charge controller or inverter.
Step 2: Select an Inverter and Monitoring Equipment
Choosing the right inverter is critical because it converts the DC output of the solar panels into AC power compatible with the home grid. A grid‑tie inverter with built‑in export‑limit monitoring ensures compliance with utility‑mandated maximum export values. In addition, a smart meter that records both import and export flows provides the data needed for accurate billing.
For installations that require a higher power output, the Callsun 400W Bifacial Solar Panel Kit delivers up to 400 W per pair of panels and includes bifacial technology that captures reflected sunlight, increasing overall yield by up to 30%. When paired with a suitably sized inverter, the system can generate sufficient surplus to make feed‑in tariffs financially attractive.
Key product details: price $294.05, rating 4.8/5 from 219 reviews, and a compact footprint (51.3 × 30.3 × 1.4 in). The kit’s pre‑drilled mounting holes and robust aluminum frame simplify installation on rooftops or van roofs, reducing labor time.
Step 3: Install the Solar Panels and Mounting System
Proper installation begins with selecting a location that receives unobstructed sunlight for the majority of the day. The tilt angle should be set to the latitude of the site, with seasonal adjustments possible via adjustable kickstands or a fixed mounting bracket. Panels must be securely fastened to withstand wind loads of at least 2400 Pa, as specified by most utility interconnection standards.
For a portable solution, the FlexSolar 100W Foldable Solar Panel offers an ultra‑lightweight option that can be deployed on a ground‑mounted frame during the commissioning phase. Its 4.1 lb weight and 0.59‑inch profile allow rapid setup, while the built‑in 45 W USB‑C PD port and 100 W DC output provide versatile connection options for testing the inverter before permanent mounting.
Key product details: price $85.49, rating 4.4/5 from 294 reviews, and an IP67 rating that protects against rain and dust during installation. The included carry bag and foldable design reduce the risk of damage while transporting the panels to the roof.
When a larger, permanent system is desired, the Renogy 100W N-Type Solar Panel serves as a high‑efficiency, low‑temperature‑coefficient module that maintains performance in hot climates. Its 25% conversion efficiency and IP67 protection make it suitable for long‑term rooftop deployment.
Key product details: price $74.79, rating 4.7/5 from 164 reviews, and a lightweight 16 lb design that eases handling during mounting.
Step 4: Connect to the Grid and Complete Interconnection Application
After physical installation, the next step is to wire the panels to the inverter, then to the home’s main service panel through a dedicated circuit breaker. All connections must use appropriately rated conductors and follow the National Electrical Code (NEC) guidelines. The inverter’s export‑limit setting should be configured to the maximum value allowed by the utility, often expressed as a percentage of the inverter’s rated capacity.
For a complete, ready‑to‑install solution, the ECO‑WORTHY 200W Solar Panel Kit includes two 100 W panels, mounting brackets, a 30 A PWM charge controller, and pre‑drilled cables. This kit simplifies the wiring process and ensures that the system complies with typical interconnection standards.
Key product details: price $185.99, rating 4.6/5 from 1,144 reviews, and a comprehensive package that reduces the need for additional components. The kit’s IP65‑rated junction box and corrosion‑resistant frame provide durability for outdoor exposure.
Once the hardware is in place, the homeowner must submit the interconnection application to the utility. Required documents usually include a single‑line diagram, equipment specifications, and proof of compliance with UL and IEC standards. The utility will review the submission, schedule an inspection, and, upon approval, enable two‑way power flow.
Step 5: Activate Net Metering or Feed‑in Tariff and Monitor Performance
After the utility grants permission, the meter is upgraded to a bidirectional model that records both consumption and export. The homeowner should verify that the inverter’s export‑limit is correctly set and that the monitoring portal displays real‑time data. Regularly reviewing the export figures helps ensure that the system remains within contractual limits and maximizes revenue.
For ongoing performance tracking, a dedicated energy management app can be paired with the inverter. Many modern inverters provide APIs that allow third‑party apps to display daily, monthly, and yearly export totals. Accurate monitoring also assists in identifying shading issues or equipment degradation early.
When the system consistently generates surplus, the homeowner receives credit on the utility bill (net metering) or a monetary payment (feed‑in tariff). The exact compensation depends on the local policy, but the financial benefit can offset the initial investment within a few years.
Tips & Pro Tips
- Schedule a professional inspection after installation to verify that all connections meet code and that the inverter is correctly configured.
- Consider adding a small battery bank to store excess energy for use during peak‑price periods, thereby increasing overall savings.
- Maintain a clear line of sight to the sun by trimming nearby trees or installing the panels on a roof with minimal shading.
- Periodically clean the panel surface to remove dust and debris; even a thin layer of grime can reduce output by up to 5%.
- Document all equipment serial numbers and keep warranty information in a safe place; many manufacturers require proof of purchase for support.
Troubleshooting
Problem: Exported power is lower than expected.
Solution: Verify that the inverter’s export‑limit is set to the utility‑approved value. Check for shading, debris, or loose connections. Use the monitoring app to compare real‑time output with the panel’s rated capacity.
Problem: Utility meter does not register export.
Solution: Confirm that the bidirectional meter has been installed by the utility. If the meter is still a one‑way device, request an upgrade. Ensure that the inverter’s grounding and neutral connections follow the utility’s specifications.
Problem: Inverter shuts down due to over‑voltage.
Solution: Reduce the export‑limit setting or install a voltage regulator. Verify that the system voltage matches the grid voltage range specified by the utility.
Conclusion
By following this step‑by‑step guide, a homeowner can transform unused solar electricity into a revenue stream through net metering or feed‑in tariffs. The process involves confirming eligibility, selecting compliant equipment, installing panels securely, completing the interconnection application, and monitoring performance. With careful planning and the right tools, the financial return on a solar investment can be accelerated while contributing to a sustainable energy future.
Readers are encouraged to assess their local utility policies, choose equipment that meets certification standards, and maintain the system for optimal performance. The journey from generation to earnings is achievable with diligence and the appropriate resources.
Products Mentioned in This Guide
Frequently Asked Questions
What is net metering and how does it let me earn money from excess solar power?
Net metering credits you for each kilowatt‑hour you export to the grid, offsetting your electricity bill at the same retail rate.
How do feed‑in tariffs differ from net metering?
Feed‑in tariffs pay a fixed rate for all exported electricity, often higher than retail rates but usually without offsetting consumption.
What equipment is required to sell surplus solar electricity back to the grid?
You need a grid‑connected inverter with export‑limit monitoring, a bi‑directional meter, and any utility‑approved safety disconnects.
What are the basic steps to enroll in a net metering or feed‑in tariff program?
Contact your utility, submit an interconnection application, install approved hardware, and pass the utility’s inspection before activation.
What common issues can prevent my solar system from exporting power, and how can I troubleshoot them?
Export limits, inverter errors, or meter mismatches can block export; check inverter settings, verify meter configuration, and contact the utility for assistance.