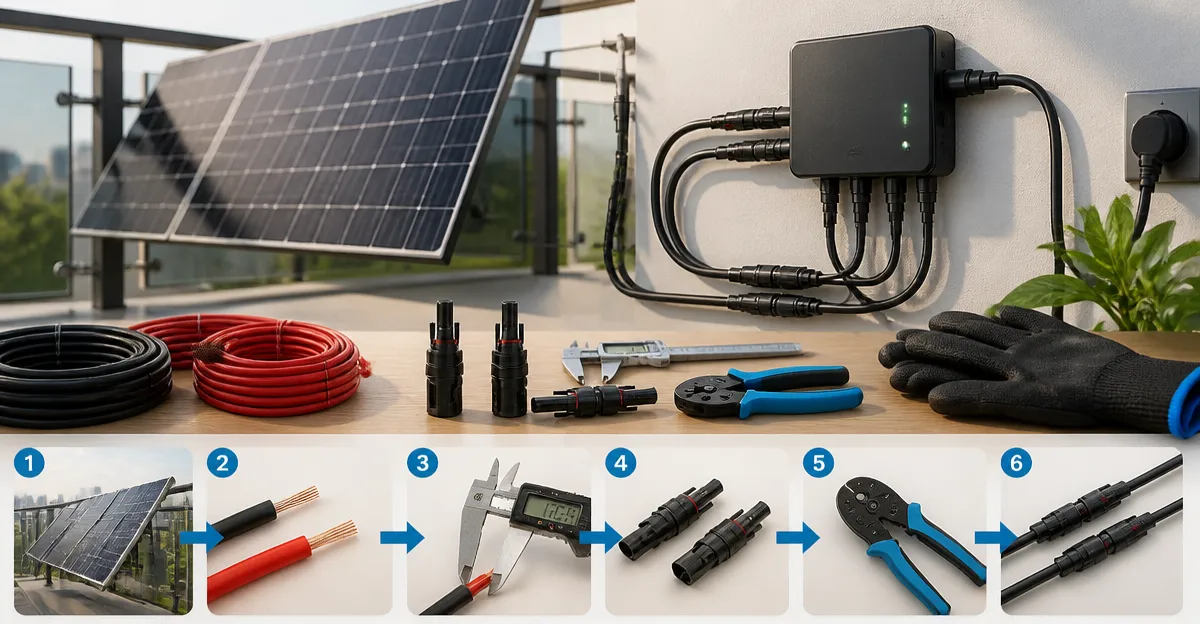
How to Size Balcony Solar Cables and MC4 Connectors: Step‑by‑Step Guide for Renogy, SOLPERK & Voltset
Introduction
Balcony solar installations provide a practical way to generate clean energy in urban environments. This guide explains how to calculate the appropriate cable size, select reliable MC4 connectors, and complete a safe, efficient wiring job. Readers will understand why cable gauge matters, how voltage drop affects performance, and which tools simplify the process. By following the steps, one can achieve a durable connection that maximizes power from Renogy, SOLPERK, or Voltset panels.
What You'll Need
- Hiutgowt 10AWG Solar Wire – 50 ft of tinned copper, rated 40 A, IP68 waterproof.
- BougeRV Solar Crimper Kit – includes crimper, spanners, and 12 pairs of MC4 connectors.
- BougeRV Solar Connectors 12 Pack – additional MC4 male/female pairs for spare or expansion.
- Bateria Power 10AWG Solar Cable – 30 ft pre‑terminated extension cables.
- JUYLTOOL Solar Connector Kit – bulk set of 60 connectors and a ratcheting crimper.
- Wire strippers, multimeter, cable ties, and a suitable solar charge controller.
Step‑by‑Step Instructions
1. Assess Power Requirements and Panel Layout
Begin by listing the total wattage of the balcony panels, typically 100 W to 300 W per module for Renogy, SOLPERK, or Voltset. Multiply the wattage by the panel voltage to obtain the maximum current (I = P / V). For a 250 W panel at 30 V, the current is approximately 8.3 A. Record this value because it determines the minimum ampacity of the cable.
Next, sketch the physical layout of the balcony, noting the distance from the panel mounting point to the charge controller. Include any bends or obstacles that may increase the effective length. This layout will be used to calculate voltage drop.
Consult the manufacturer's specifications for the recommended maximum voltage drop, usually 2‑3 % for photovoltaic strings. Using the formula Vdrop = I × (2 × L × R), where L is one‑way length in meters and R is resistance per meter for the chosen gauge, you can estimate the required cable size.
At this stage, the guide recommends using Hiutgowt 10AWG Solar Wire because its 10 AWG rating comfortably exceeds the 8.3 A current and provides a low resistance path, reducing voltage drop to well below the 3 % threshold for typical balcony distances of 5‑10 m.
2. Determine Cable Length and Routing Path
Measure the exact distance from the panel’s output terminals to the charge controller input, adding 10 % extra for routing around railings or through conduit. For example, a 7 m straight line plus 0.7 m extra yields an 7.7 m (approximately 25 ft) run.
Because the Hiutgowt 10AWG Solar Wire comes in a 50 ft roll (black and red), you will have sufficient length for both positive and negative conductors without needing a second roll. The generous length also allows you to create spare loops for future expansion.
Secure the cable using UV‑resistant zip ties, ensuring the ties do not compress the wire excessively, which could affect flexibility. The wire's IP68 rating protects it from rain, snow, and condensation common on balconies.
If you prefer a pre‑terminated solution, the Bateria Power 10AWG Solar Cable provides 30 ft of black and red cables with built‑in male and female waterproof connectors, simplifying the installation.
3. Select the Appropriate MC4 Connectors
MC4 connectors are the industry standard for solar panel interconnections. Choose connectors rated for the same gauge as your cable; 10 AWG requires MC4 connectors compatible with 10‑12 AWG wires. Both the BougeRV Solar Crimper Kit and the BougeRV Solar Connectors 12 Pack include MC4 male/female pairs that meet this requirement.
The connectors feature a waterproof ring (IP67) and PPO insulation, ensuring long‑term resistance to UV, rain, and dust. This matches the durability of the cable and maintains system safety.
For larger projects or when a bulk inventory is desired, the JUYLTOOL Solar Connector Kit supplies 60 connectors, providing ample spares and allowing you to standardize on a single connector type across multiple balcony installations.
When connecting, always use the male connector on the panel side and the female connector on the cable side, following the polarity markings on the MC4 housing.
4. Prepare and Crimp the Connectors
Strip 10‑12 mm of insulation from the cable ends using a quality wire stripper. The tinned copper core of the Hiutgowt 10AWG Solar Wire peels cleanly, allowing a smooth insertion into the connector barrel.
Insert the stripped end into the MC4 connector barrel until the copper makes full contact with the internal terminal. Use the high‑precision crimper from the BougeRV Solar Crimper Kit to apply a firm, even pressure. The ratcheting mechanism ensures a repeatable crimp that meets UL94 flame‑retardant standards.
After crimping, verify the connection by pulling gently on the wire; it should not slip. Then use the included spanners to tighten the MC4 coupling, ensuring a watertight seal. The spanners are designed to apply the correct torque without damaging the connector housing.
If you have a larger inventory of connectors, the JUYLTOOL Solar Connector Kit provides a second crimper with a ratcheting action that reduces hand fatigue during batch crimping.
5. Install the Cable Assembly on the Balcony
Route the positive (red) and negative (black) cables from the panel to the charge controller, keeping them separated from any metallic balcony railings to avoid induced currents. Secure the cables at 30‑cm intervals using UV‑resistant zip ties.
Connect the MC4 male connector to the panel output, then mate the female connector on the cable. Ensure the locking tabs click into place, indicating a secure seal. Repeat for the negative conductor.
After all connections are made, use a multimeter to confirm polarity and check for continuity. A reading of near‑zero resistance confirms a proper crimp and connector assembly.
Finally, attach the cable bundle to the charge controller, following the manufacturer’s wiring diagram. Verify that the controller registers the correct voltage and current; any significant deviation may indicate a high voltage drop, prompting a review of cable length or gauge.
6. Verify System Performance and Safety
Power up the system during daylight and monitor the charge controller for the expected voltage (typically 12‑24 V for balcony setups). Record the voltage at the panel and at the controller; the difference should not exceed the 2‑3 % design limit.
If the voltage drop is higher, consider shortening the cable run or adding a parallel cable to reduce resistance. The flexibility of the Hiutgowt 10AWG Solar Wire makes re‑routing straightforward.
Inspect all MC4 connections for moisture ingress after the first rain. The IP67 rating of the connectors, combined with the IP68 cable jacket, should prevent water entry, but visual inspection ensures long‑term reliability.
Document the installation with photos and a wiring diagram for future maintenance, especially if you plan to expand the balcony array.
Tips & Pro Tips
- Always use tinned copper conductors; they resist corrosion better than bare copper, especially in humid balcony environments.
- When cutting cable, leave a short excess (2‑3 in) to allow for future adjustments without re‑crimping.
- Apply a small amount of silicone sealant around the MC4 coupling if the balcony is exposed to sea‑spray, adding an extra barrier against salt corrosion.
- Label each cable end with heat‑shrink tubing or permanent markers to avoid polarity errors during future service.
- Store the BougeRV Solar Crimper Kit in a dry case; the included zippered case protects the tool and connectors from damage.
Troubleshooting
Problem: Voltage at the charge controller is significantly lower than panel voltage.
Solution: Check for loose crimps, damaged cable insulation, or excessive length. Re‑crimp any suspect connectors using the crimper and verify continuity with a multimeter.
Problem: MC4 connectors feel loose or do not lock.
Solution: Ensure the connector pins are fully inserted before crimping. Use the spanner from the BougeRV Solar Crimper Kit to apply the proper torque.
Problem: Cable insulation appears cracked after installation.
Solution: Replace the affected segment with a new piece of Hiutgowt 10AWG Solar Wire. Its XLPE/XLPO jacket resists UV and temperature extremes, reducing the likelihood of future cracking.
Conclusion
This guide has demonstrated how to size balcony solar cables, select appropriate MC4 connectors, and assemble a reliable photovoltaic connection. By calculating current, accounting for voltage drop, and using high‑quality 10 AWG tinned copper wire, installers achieve low‑loss power delivery. The recommended tools – the BougeRV Solar Crimper Kit, BougeRV Solar Connectors 12 Pack, and the JUYLTOOL Solar Connector Kit – streamline the process and ensure long‑term durability. Whether installing Renogy, SOLPERK, or Voltset panels, the principles remain the same, enabling urban dwellers to harvest solar energy safely and efficiently.
Products Mentioned in This Guide
Frequently Asked Questions
How do I determine the correct cable gauge for a balcony solar panel?
Calculate the expected current and distance, then use a voltage‑drop chart to select a wire size (e.g., 10 AWG for up to 40 A over 10 m).
What is voltage drop and why is it important for balcony solar installations?
Voltage drop is the loss of voltage along the cable; excessive drop reduces panel output and efficiency, so keeping it below 2‑3% is recommended.
Which MC4 connector type should I use with Renogy, SOLPERK, or Voltset panels?
Use standard 10 A MC4 male/female connectors rated for UV and waterproof performance, matching the panel’s current rating.
How many meters of solar cable are needed for a typical balcony setup?
Measure the run from the panel to the charge controller; most balcony systems require 5‑10 m of cable, allowing extra length for routing.
What tools are essential for installing MC4 connectors safely?
A solar crimper kit, wire stripper, torque wrench, and heat‑shrink tubing are needed to make secure, waterproof MC4 connections.